Use this short tutorials to get to know how Echo Budget works and what you can do with it. All tutorials are in Python3 and Flask for simplicity purposes. This tutorials do not cover how to write Python of Flask applications, but rather let you get familiar with Echo Budget’s possibilities
It is recomended to finish 1. Setting up the service and 2. Specifying Parameters before moving to the third section
0. Introduction
Echo Budget does not do any calculations on the device and depends on the services, that developers create and share. Android application speaks with services via HTTP requests by sending transactions, optional parameters and waits for the service to return valid data to show
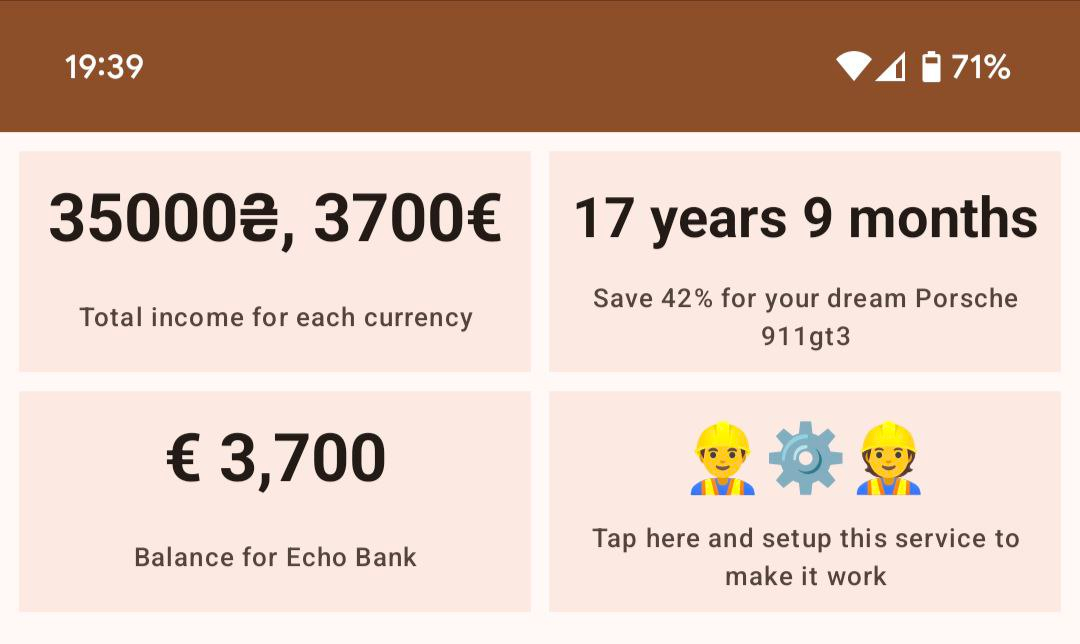
E.g. there are 4 services on the screenshot below. First row consists of 2 TEXT-services (we will speak about it later). App sends current transactions and expects string, that it will display. In the bottom-left corner there is a MONEY-service. Here app sends the same transactions to this service but expects to receive money amount and currency. As you can see, money fields are formatted differently, because “Total income for each currency” is formatted on the server and “Balance for the Echo Bank” is formatted on device with awareness of the user locale. Bottom-right service asks for some initial setup to work, this topic would be covered in section 2 and 3
1. Setting up the service
First out of three endpoints is the starting point for an Echo Budget app to know, that your service exists.
Lets look at this piece of code:
from flask import Flask, request, jsonify

app = Flask(__name__)

@app.route("/metadata")
def my_service_metadata():
  return jsonify({"service_type": "TEXT"})
/metadata— starting point for a service. App makesGETrequest to this endpoint to see what type of data your service provides.{"service_type": "TEXT"}— response JSON for this endpoint. Current example will showTEXTtype. For more information and types refer to the documentation
2. Specifying Parameters
This step is optional. Skip it, if your service does not need setup from user and can work only with transactions
Some services require at least some setup to work. Currently there are 12 different settings you can ask user to fill, which we will try
This endpoint is rather short. It only has to return a simple JSON with list of parameter, which would be specified below. Replace an empty list with list of your parameters:
@app.route("/parameters")
def my_service_parameters():
  return jsonify({"parameters": []})
Leave the list above blank for now and add services you need while we go through them
Parameters
All parameters are described in this page: Parameters
Using parameters
Write proper data, if you know what type of parameters you would like to receive from user and place them in the list mentioned above. For example, let’s suppose, that our service requires a date, a checkbox, an account and multiple-choice parameters. Alltogether it would look like this:
parameter_date = {
    "id": "test-parameter-date",
    "hint": "Select starting date for future calculations",
    "type": "DATE"
}

parameter_checkbox = {
    "id": "test-parameter-checkbox",
    "hint": "Count only negative transactions",
    "type": "CHECKBOX"
}

parameter_account = {
    "id": "test-parameter-account",
    "hint": "Select an account, where you spend/earn money",
    "type": "ACCOUNT"
}

parameter_multiplechoice = {
    "id": "test-parameter-options",
    "hint": "Select what statistics to show",
    "type": "MULTIPLECHOICE",
    "range_min": 1,
    # "range_max" is omitted, because the upper bound is option's length itself
    "options": [
        {"id": "average", "title": "Show average"},
        {"id": "median", "title": "Show median"},
    ]
}

@app.route("/parameters")
def my_service_parameters():

    # Parameters are displayed in the same order they are received
    return jsonify({"parameters": [parameter_date, parameter_multiplechoice, parameter_account, parameter_checkbox]})
Great! Now to the next step, the most interesting part: actual calculations
3. Transaction processing
Here your service is required to setup the last, third endpoint for processing. Important is, that this enpoint accepts only POST requests, because app will send a JSON:
@app.route("/process", methods=["POST"])
def my_service_process():
    ...
Parsing parameters
Skip this section, if you dont need any parameters
When doing calculations, if you require some parameters, that user did not provide, return 422 Unprocessable Content with json to show error
data = request.json
parameters = data["parameters"]

# return 422, if parameters amount does not match
if (len(parameters) != 4):
    return jsonify({"hint": "error"}), 422

date = next((param["date"] for param in parameters if param["id"] == "test-parameter-date"), None)
account_id = next((param["account_id"] for param in parameters if param["id"] == "test-parameter-account"), None)
options = next((param["option_ids"] for param in parameters if param["id"] == "test-parameter-options"), None)
is_only_negative = next((param["checked"] for param in parameters if param["id"] == "test-parameter-checkbox"), None)

# If some of the required parameters are not presented
if date == None or account_id == None or options == None or is_only_negative == None:
    return jsonify({"hint": "error"}), 422
This code verifies that our service received all the data and now we can work on it. Let’s do a calculations on the transactions to calculcate what is an average and median transaction amount for an account after a certain date
As a reminder, here is a data model of a transaction. Nullable values have a question mark next to their type, like “String?”. For more details read Transactions
Transaction(
    id: Long,
    money: Long,
    category_id: Long?,
    type_id: Long?,
    subtype_id: Long?,
    account_id: Long,
    currency_code: String,
    timestamp: String
)
1. Filter old values
Because we are working with dates, it is important to use a proper tool. Import datetime:
from datetime import datetime as dt
And lets filter out unnecessary transactions:
# filter by date
starting_date = dt.strptime(date, "%Y-%m-%d").timestamp()
transactions = [t for t in data["transactions"] if dt.fromisoformat(t["timestamp"]).timestamp() > starting_date]

# filter by account
transactions = [t for t in transactions if t["account_id"] == account_id]

# filter only negative
if is_only_negative:
    transactions = [t for t in transactions if t["money"] < 0]
2. Make calculations
Now lets finally count what user asked us to do. For simplicity, i suppose, that account is in EUR:
average = None
if "average" in options and len(transactions) != 0:
    average = sum([t["money"] for t in transactions]) / len(transactions)
    average = round(average / 100, 2) # because EUR has 100 cents in 1 euro

median = None
if "median" in options and len(transactions) != 0:
    median = sorted([t["money"] for t in transactions])[len(transactions) // 2]
    median = round(median / 100, 2) # because EUR has 100 cents in 1 euro
3. Return the results
Remember how we set up the service and said, that our service is a TEXT-service? This type of services have a special JSON-schema, that look like this:
{
    "hint": String,
    "label": String
}
hint— A short sentence, that describes what these calculations meanlabel— string, that represents your calculations
Final lines of out code would look like this:
hint = "placeholder"
label = "placeholder"

transaction_label = "spendings" if is_only_negative else "transactions"
if average != None and median != None:
    hint = f"Average and median {transaction_label} since {date}"
    label = f"€ {average} | € {median}"
else if average != None:
    hint = f"Average {transaction_label} since {date}"
    label = f"€ {average}"
else if median != None:
    hint = f"Median {transaction_label} since {date}"
    label = f"€ {median}"

if hint == "":
    hint = "No hint"

if label == "":
    label = "No label"

return jsonify({"hint": hint, "label": label})
Final code
from flask import Flask, request, jsonify
from datetime import datetime as dt

app = Flask(__name__)

parameter_date = {
    "id": "test-parameter-date",
    "hint": "Select starting date for future calculations",
    "type": "DATE"
}

parameter_checkbox = {
    "id": "test-parameter-checkbox",
    "hint": "Count only negative transactions",
    "type": "CHECKBOX"
}

parameter_account = {
    "id": "test-parameter-account",
    "hint": "Select an account, where you spend/earn money",
    "type": "ACCOUNT"
}

parameter_multiplechoice = {
    "id": "test-parameter-options",
    "hint": "Select what statistics to show",
    "type": "MULTIPLECHOICE",
    "range_min": 1,
    # "range_max" is omitted, because the upper bound is option's length itself
    "options": [
        {"id": "average", "title": "Show average"},
        {"id": "median", "title": "Show median"},
    ]
}

@app.route("/metadata")
def my_service_metadata():
  return jsonify({"service_type": "TEXT"})

@app.route("/parameters")
def my_service_parameters():

    # Parameters are displayed in the same order they are received
    return jsonify({"parameters": [parameter_date, parameter_multiplechoice, parameter_account, parameter_checkbox]})

@app.route("/process", methods=["POST"])
def param_account_process():

    data = request.json
    parameters = data["parameters"]

    # return 422, if parameters amount does not match
    if (len(parameters) != 4):
         return jsonify({"hint": "error"}), 422

    date = next((param["date"] for param in parameters if param["id"] == "test-parameter-date"), None)
    account_id = next((param["account_id"] for param in parameters if param["id"] == "test-parameter-account"), None)
    options = next((param["option_ids"] for param in parameters if param["id"] == "test-parameter-options"), None)
    is_only_negative = next((param["checked"] for param in parameters if param["id"] == "test-parameter-checkbox"), None)

    # If some of the required parameters are not presented
    if date == None or account_id == None or options == None or is_only_negative == None:
         return jsonify({"hint": "error"}), 422

    # filter by date
    starting_date = dt.strptime(date, "%Y-%m-%d").timestamp()
    transactions = [t for t in data["transactions"] if dt.fromisoformat(t["timestamp"]).timestamp() > starting_date]

    # filter by account
    transactions = [t for t in transactions if t["account_id"] == account_id]

    # filter only negative
    if is_only_negative:
        transactions = [t for t in transactions if t["money"] < 0]

    average = None
    if "average" in options and len(transactions) != 0:
        average = sum([t["money"] for t in transactions]) / len(transactions)
        average = round(average / 100, 2) # because EUR has 100 cents in 1 euro

    median = None
    if "median" in options and len(transactions) != 0:
        median = sorted([t["money"] for t in transactions])[len(transactions) // 2]
        median = round(median / 100, 2) # because EUR has 100 cents in 1 euro

    hint = ""
    label = ""

    transaction_label = "spendings" if is_only_negative else "transactions"
    if average != None and median != None:
        hint = f"Average and median {transaction_label} since {date}"
        label = f"€ {average} | € {median}"
    elif average != None:
        hint = f"Average {transaction_label} since {date}"
        label = f"€ {average}"
    elif median != None:
        hint = f"Median {transaction_label} since {date}"
        label = f"€ {median}"

    if hint == "":
        hint = "No hint"

    if label == "":
        label = "No label"

    return jsonify({"hint": hint, "label": label})

# Run the app
app.run("0.0.0.0", port = 8080)
4. Testing
Now run your code. Install Flask, if you did not install yet.
In the console output you would see something like this:
 * Serving Flask app 'test'
 * Debug mode: off
WARNING: This is a development server. Do not use it in a production deployment. Use a production WSGI server instead.
 * Running on all addresses (0.0.0.0)
 * Running on http://127.0.0.1:8080
 * Running on http://192.168.0.105:8080
Press CTRL+C to quit
Below you see the IP-address of your machine in the local network: http://192.168.0.105:8080. If your phone is connected to the same Wi-Fi, copy and paste it in the Settings > For Developers
Now, if you open the Dashboard screen, you would see a new tile in the top-left corner with 2 workers and text “Tap here and setup this service to make it work”. Choose whatever options you like
If there is an error, then there is something on the service side. Now you know the basics and can create your own services! Congrats!
Join Telegram channel and Instagram to get news and updates about new features an app can provide for your services